| |
|
|
|
| |
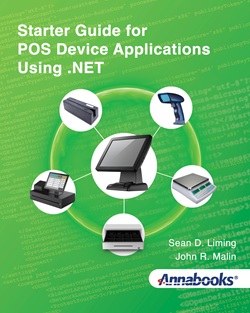
Starter Guide for POS Device Applications Using
.NET
|
|
|
By Sean D. Liming and John R. Malin
Barcode scanners, magnetic swipe readers, and receipt
printers are not just used for cash registers. They can be
found in many applications such as shipping systems,
security, inventory systems, slot machines, information
kiosks, checking counters, and much more. Many of these
systems run a .NET application on Windows. Starter Guide for
POS Device Applications Using .NET walks you through
creating .NET Framework and .NET applications that access
different POS devices.
Microsoft continues to improve Windows® and .NET to
modernize application development. .NET 8 and the latest
version of Windows® 10 and Windows® 11 now include support
for the Windows.Devices.PointOfService namespace. The book
brings together and updates POS for .NET and POS for WinRT
to their latest versions. The book covers the following:
- Updated coverage for POS for .NET 1.14.1SDK.
- Creating WPF and .NET applications to access the POS
WinRT device assemblies built into Windows.
- Device discovery and Enumeration Techniques.
- Example applications for Bar Code Scanner, POS
Printer, Cash Drawer, Magnetic Stripe Reader, and Poll
Display devices.
- Exploring how to use pipes to communicate between POS
WinRT and POS for .NET Service Objects.
- Over 30 exercises and examples.
|
|
Starter Guide for POS Device Applications Using .N
....
Liming, Sean D and Malin, John R
|
Book Details
Paperback: 330 Pages
Publisher: Annabooks (May 2025)
Language: English
ISBN-13:979-8-9854172-4-1
|
|
| |
|
|
|
Software Requirements:
- Microsoft® Visual Studio® 2022
- POS for .NET 1.14.1 SDK
- Windows® 10 21H1 or Higher or Windows® 11
- .NET 8 or higher
|
Hardware Requirements:
Here is some of the POS hardware used for the exercises:
- Honeywell (HHP) Bar Code Scanner – IT5600
(5600SR050) USB/HID.
- MagTek USB/HID MSR – 21040101 or
21040102.
- Avery-Berkel (Weigh-Tronix) POS Scale 6710.
- EPSON T-T88V Receipt Printer with UB-E04 Ethernet
interface.
- MMF Cash Drawer – VAL-u Line® MMFVAL 1313E04.
- EPSON DM-D110 Pole Display.
|
| |
|
|
| |
Book Downloads:
|
|
| |
Book Exercises -
Zip file contains files for use with exercises and Visual
Studio 2021 source code projects. |
| |
|
|
| |
Table of Contents:
|
|
| |
1
INTRODUCTION
1.1 A LITTLE HISTORY
1.2 WHAT IS POS FOR .NET FRAMEWORK AND
POS WINRT: A BRIEF HISTORY
1.3 ABOUT THE BOOK
1.4 HONORABLE MENTION RETAIL MANAGEMENT
SYSTEM (RMS)
1.5 SOFTWARE / HARDWARE REQUIREMENTS FOR
THE EXERCISES
1.5.1 Development
System
1.5.2 POS Hardware
1.5.3 Software
1.6 DOWNLOAD BOOK
EXERCISES
1.7 SUMMARY – GET GOING WITH POS
DEVELOPMENT
2 POS FOR .NET ARCHITECTURE AND THE
SDK
2.1 OLE FOR POS (OPOS)
ARCHITECTURE
2.2 UNIFIEDPOS
SUMMARIZED
2.2.1 Applications
2.2.2 Service Object / OPOS
driver
2.3 POS FOR .NET
ARCHITECTURE
2.4 POS FOR .NET CLASSES AND
INTERACTIONS
2.4.1 PosExplorer
2.4.2 Application
Interaction
2.5 CHOOSING POS DEVICES
CAREFULLY
2.5.1 Choose POS devices that have
Service Object or OPOS support
2.5.2 USB HID vs. Keyboard
Wedge
2.5.3 Serial Interface and Create a
Service Object
2.5.4 Create the Application to call the
Default POS Device
2.6 EXERCISE 2.1 INSTALL AND REVIEW THE
POS FOR .NET SDK
2.7 EXERCISE 2.2 SDK: EXAMPLE OF SERVICE
OBJECT SETUP
2.7.1 Part 1: Create an XML
Configuration File for a USB HID Scanner
2.7.2 Part 2: Create an XML
Configuration File for a USB HID MSR
2.8 SUMMARY: READY TO
GO
3 CREATING POS FOR .NET APPLICATIONS FOR
DIFFERENT POS DEVICES
3.1 EXERCISE 3.1 – BARCODE SCANNER
APPLICATION
3.1.1 Part 1: Create the Application and
Form
3.1.2 Part 2: Adding the POS for .NET
Libraries and Code
3.1.3 Part 3: Build and
Test
3.2 EXERCISE 3.2 MSR
APPLICATION
3.2.1 Create the Visual Studio
Project
3.2.2 Set Up the XAML
Controls
3.2.3 Part 2: Adding the POS for .NET
Libraries and Code
3.2.4 Part 3: Build and
Test
3.3 EPSON OPOS ADK FOR .NET V1.14.30E
SETUP
3.4 EXERCISE 3.3 POLE DISPLAY
APPLICATION
3.4.1 Part 1: Set Up the OPOS driver for
the Pole Display
3.4.2 Part 2: Create the Pole Display
Application
3.4.3 Part 3: Add the POS for .NET
Libraries and Code
3.4.4 Part 4: Build and
Test
3.5 EXERCISE 3.4 RECEIPT PRINTER
APPLICATION
3.5.1 Part 1: Set Up the OPOS driver for
the Receipt Printer
3.5.2 Part 2: Create the Receipt Printer
Application
3.5.3 Part 3: Add the POS for .NET
Libraries and Code
3.5.4 Part 4: Build and
Test
3.6 EXERCISE 3.5 ADDING THE CASHDRAWER
DEVICE TO THE PRINTER APPLICATION
3.6.1 Part 1: Setup the OPOS driver for
the Cash Drawer
3.6.2 Part 2: Modify the Printer
Application
3.6.3 Part 3: Build and
Test
3.7 APPLICATION
RECOMMENDATIONS
3.8 SUMMARY: FROM ARCHITECTURE TO
APPLICATION
4 POS FOR .NET DEVICE
MANAGEMENT
4.1 POSDM UTILITY
4.2 EXERCISE 4.1 SET LOGICAL NAME FOR
THE EXAMPLE SCANNER SERVICE OBJECT
4.3 WMI SUPPORT
4.3.1 The ServiceObject
Class
4.3.2 The PosDevice
Class
4.3.3 LogicalDevice
Class
4.3.4 DeviceProperty
Class
4.3.5 WMI Code Creator
Utility
4.4 EXERCISE 4.2 USING WMI IN
POWERSHELL
4.4.1 Sub Exercise 1: PowerShell
Equivalent to POSDM LISTDEVICES
4.4.2 Sub Exercise 2: PowerShell
Equivalent to POSDM LISTNAMES
4.4.3 Sub Exercise 3: Custom Information
Using the ServiceObject Class
4.5 EXERCISE 4.3: CUSTOM MANAGEMENT
SOLUTION
4.5.1 Part 1: Create the
Project
4.5.2 Part 2: Add the Code Behind the
Button
4.5.3 Part 3: Build and
Test
4.6 SERVICE OBJECT MANAGER
(SOMANAGER.EXE)
4.7 BIG WARNING! WINDOWS UPDATES
BREAKING POS FOR .NET WMI
4.8 POS PERFORMANCE MONITORING –
WALK-THROUGH EXAMPLE
4.9 SUMMARY: TAKE
CONTROL
5 POS FOR .NET SERVICE
OBJECTS
5.1 SIMPLIFYING SERVICE OBJECT
DEVELOPMENT WITH INTERFACE, BASIC, AND BASE
CLASSES
5.1.1 Interface Class
5.1.2 Basic Class
5.1.3 Base Classes
5.2 POS SCALE SERVICE OBJECT
BACKGROUND
5.3 EXERCISE 5.1: POS SCALE TEST
APPLICATION
5.3.1 Part 1: Create the Application and
Form
5.3.2 Part 2: Adding the
Code
5.3.3 Part 3: Build and
Test
5.4 EXERCISE 5.2: POS SCALE SERVICE
OBJECT
5.4.1 Part 1: Project
Setup
5.4.2 Part 2: Filling in the POS Scale
Service Object
5.4.3 Part 3: Set Up the Service
Object
5.5 EXERCISE 5.3 SCALE
APPLICATION
5.5.1 Part 1: Create the Application and
Form
5.5.2 Part 2: Adding the
Code
5.5.3 Part 3: Build and
Test
5.6 EXERCISE 5.3 MODIFY THE EXAMPLE MSR
SO FOR HARDCODE ID
5.6.1 Part 1: Get the Hardware
IDs
5.6.2 Part 2: Adding the
HardwareIDAttribute
5.7 THREE METHODS TO SETUP A SERVICE
OBJECT
5.8 WHAT ABOUT PIN
PADS?
5.9 SUMMARY: SERVICE OBJECTS – THE KEY
TO WRITE ONCE, SUPPORT MANY
|
6 .NET AND POS WINRT
6.1 DEVICE ENUMERATION
METHODS
6.2 POS WINRT NAMESPACES AND UNIVERSAL
WINDOWS ASSEMBLY SUPPORT
6.3 EXERCISES 6.1: USB BARCODE AND
DEVELOPMENT SYSTEM SETUP
6.4 EXERCISE 6.2: USING A DEVICE PICKER
(UWP APPLICATION)
6.4.1 Create the Visual Studio
Project
6.4.2 Set Up the XAML
Controls
6.4.3 Write the code
6.4.4 Test the
Application
6.5 EXERCISE 6.3: REMEMBERING A DEVICE
ID
6.6 EXERCISE 6.4: GETTING FIRST
AVAILABLE DEVICE USING DEFAULTASYNC()
6.6.1 Create the Visual Studio
Project
6.6.2 Set Up the XAML
Controls
6.6.3 Write the code
6.6.4 Test the
Application
6.7 EXERCISE 6.5: SNAPSHOT OF DEVICES
FOR CUSTOM INTERFACES
6.7.1 Create the Visual Studio
Project
6.7.2 Set Up the XAML
Controls
6.7.3 Write the code
6.7.4 Test the
Application
6.8 EXERCISE 6.6: USING A DEVICE
WATCHER
6.8.1 Create the Visual Studio
Project
6.8.2 Set Up the XAML
Controls
6.8.3 Write the code
6.8.4 Test the
Application
6.9 SUMMARY 188
7 CREATING POS WINRT APPLICATIONS FOR
DIFFERENT POS DEVICES
7.1 EXERCISE 7.1: MAGNETIC STRIPE READER
(MSR) USING DEVICE WATCHER
7.1.1 MSR Setup
7.1.2 Create the Visual Studio
Project
7.1.3 Set Up the XAML
Controls
7.1.4 Write the code
7.1.5 Test the Application
7.1.6 Driver License
Test
7.2 EXERCISE 7.2 LINE/POLE DISPLAY USING
DEVICE WATCHER
7.2.1 OPOS Driver
Setup
7.2.2 Create the Visual Studio
Project
7.2.3 Set Up the XAML
Controls
7.2.4 Write the code
7.2.5 Test the
Application
7.3 EXERCISE 7.3: POS RECEIPT PRINTER
AND CASH DRAWER USING DEVICE WATCHER
7.3.1 Printer Setup
7.3.2 Create the Visual Studio
Project
7.3.3 Set Up the XAML
Controls
7.3.4 Write the code
7.3.5 Test the
Application
7.4 EXERCISE 7.4: WEBCAM BARCODE
SCANNER
7.4.1 Create the Visual Studio
Project
7.4.2 Set Up the XAML
Controls
7.4.3 Write the code
7.4.4 Test the
Application
7.5 EXERCISE 7.5: GETTING A LIST OF ALL
POS WINRT DEVICES USING SNAPSHOT
7.5.1 Create the Visual Studio
Project
7.5.2 Set Up the XAML
Controls
7.5.3 Write the code
7.5.4 Test the
Application
7.6 EXERCISE 7.6: GETTING A LIST OF ALL
POS WINRT DEVICES USING DEVICE WATCHER
7.6.1 Create the Visual Studio
Project
7.6.2 Set Up the XAML
Controls
7.6.3 Write the code
7.6.4 Test the
Application
7.7 SUMMARY
8 POS WINRT AND POS FOR .NET WORKING
TOGETHER
8.1 A LITTLE BACKSTORY
8.2 WHAT CANNOT BE
DONE
8.3 INTER-PROCESS COMMUNICATION:
PIPES
8.4 EXERCISE 8.1: POS SCALE SERVER IN
POS FOR .NET
8.4.1 Part 1: Create the
Application
8.4.2 Part 2: Adding the POS for .NET
Libraries and Code
8.5 EXERCISE 8.2: BARCODE AND WEIGHT
SCALE IN POS WINRT
8.5.1 Create the Visual Studio
Project
8.5.2 Set Up the XAML
Controls
8.5.3 Write the code
8.6 EXERCISE 8.3: TESTING BOTH
APPLICATIONS
8.7 EXERCISE 8.4: MINOR
ADDITIONS
8.7.1 Add Code to Hide the
ABScaleServer
8.7.2 Add code to EX82_Barcode_Scale
Start and Stop ABScaleServer
8.7.3 Test the Changes
8.8 IS THIS THE ONLY
SOLUTION?
8.9 POS WINRT VERSUS POS FOR .NET – POS
DEVICE SELECTION
8.10 SUMMARY
9 A FEW IDEAS
9.1 EXERCISE 9.1: SHARE RECEIPT PRINTER
AND SAVE/RESTORE POS DEVICE
9.1.1 Create the Visual Studio
Project
9.1.2 Set Up the XAML
Controls
9.1.3 Write the code
9.1.4 Test the Application on Multiple
Systems
9.2 STORE SOLUTION: INVENTORY AND CASH
REGISTER APPLICATIONS
9.3 EXERCISE 9.2: DATABASE
SETUP
9.4 EXERCISE 9.3:
INVSCANNER
9.4.1 Create the Visual Studio Project
9.4.2 Set Up the XAML
Controls
9.4.3 Write the code
9.4.4 Test the
Application
9.5 EXERCISE 9.4: CASH REGISTER
REVIEW
9.5.1 Utility.cs
9.5.2
MainWindow.xaml.cs
9.5.3 Testing the Code
9.6 SUMMARY
|
| |
|
|
| |
|
| |
Please review our refund policy before buying. |
|
| |
|
|
|


